EasyTiler
This
program comes as logical development of the EasyMapper and ImageSplitter tools.
I’ve merged them, to fully automate tileset creating process. Now with
this program, only with giving coordinates of the area, satellite imagery of
the area will be automatically downloaded, then will be also automatically
cropped, resized and splitted into parts with corresponding names to import
into Orbiter. Tile list will be generated too to import into base ini-file.
Installation:
Simply place EasyTiler.exe where you wants. When you start the
program, if you receive message missing DLL: GDIPLUS.DLL, place this DLL
provided in the package in the directory where you placed EasyTiler.exe
Usage:
1.Enter
the filename and path for the map file to be stored on your computer. You can
enter path and name manually from the "Filename for downloaded map"
field, or choose it by button "...".
2. Choose the area you want to download. You can do this in two ways from two
buttons in section "Step1: Enter the coordinates of the area". The
first button used to define area by bottom-left and top-right coordinates. You
must enter the coordinates using one of the formats, shown in the dialog.
Second button allows you to define area by center coordinates and distance in
kilometers. After entering coordinates of the center point of the area, specify
how many kilometers to left, right, up and down from this point you ewant to
download.
3.Enter the zoom level of the map. Select the zoom level of the map you can
download by "Zoom Level" slider. By default this level is 9, you can
change it to top for closer looc, and to bottom for more distant view. Changing
the level of zoom will show you how many pixels will be map you want to
download in fields "Map
Length" and "Map
Width".
4.Enter the Orbiter texture level of zoom. Choose the Orbiter texture level for
output tiles from corresponding combobox.
5.Saving the presets (optional) . If you want to save the entered coordinates
to use them later, you can do this by button "Save". Button
"Load" will restore them, to free you of entering them manually every
time.
6.Calculating Orbiter tiles coordinates. To be sure that resulting orbiter
texture tileset will be correct, press button "Step 2: Calculate Orbiter
tiles coordinates". You'll get the tileset length and width in "Map
Information" screen. If you're not satisfied, change the orbiter texture
level, or other settings and push the button again.
7.Downloading the map. When you are ready with tweaking coordinates, press the
button with black triangle on "Step 3: Download map from Internet"
section. You can see the progress of the downloading on the right. If the
"Download status" window shows you that files are downloaded, but
screen remains black, this means images are not found for area you try do
download. Try to get image of this area with more distant zoom. I think that
entire Earth is covered at zoom 9, but for higher levels you must try for
yourself. When the download completes, the program will merge the small images
downloaded into one big image, and this will take more time, the bigger map is.
When the map is more than 100 MB it will be take at least tenths of seconds,
depending of your computer. So be patient, the program is not hung up if not
responding, but harddisk works. When the job is done, you will be noted at
"Download status" field.
8.Split to tiles. This function make 3 things:
-resizing the
downloaded file
-splitting image to
tiles and renames then in orbiter format.
-generates orbiter
tileset list to include in base ini-file.
Hint: If you dont like the looks of the resized image, you can resize it by
yourself using Photoshop etc. When you satisfied from the results, replace the
file with yours. After pressing the button "Split", the program will check the image
size, and if it is matches target size, the resizing function will not be
started.
9.Converting tiles from "JPG" into "DDS". The output tiles
are named properly, but are in "JPG" format. You must convert them
manually into DDS, by using "DDS converter 2" or other software.
10. Placing the files into Orbiter. Place DDS files into "Textures2"
Orbiter directory. Copy the tileset list from output file and paste it into
base ini-file.
Disclaimer: This software is Freeware. It's not created for commersial
purposes. It is bug tested, but noone can be sure everything is worrking
properly on every possible computer system. Use it on your own
risk.
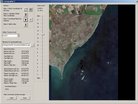
Screenshots:
Project
status: Completed. Some
bug-fixes are possible, mainly concerning a problem with the deviance of
coordinates.
Release date: 18 September 2007
Future
development: I’m planning to
fix the coordinates deviance problem if possible. The better solution may be
adding a function to select manually crop area of the image, which will be
imported to Orbiter.
Link to
Orbiter forum EasyTiler thread
Link to
Orbiter forum EasyTiler thread concerning coordinates deviance problem
DOWNLOAD